Docker 1.12 is in general availability and ready for production. Swarm has been around in previous versions of docker, however its implementation was slightly more complicated, requiring you to run swarm as container.
So why all the rage about Docker 1.12 and Swarm? Lets look at some of the feature highlights:
- Cluster management integrated with Docker Engine
- Decentralized design
- Declarative service model
- Scaling
- Desired state reconciliation
- Multi-host networking
- Service discovery
- Load balancing (Container-native load balancing.)
- Secure by default (Automated key rotation.)
- Rolling updates
Multi-Host Networking??
To me, this is by far one of the greatest enhancements to Docker. Amongst all the other awesome features built in, Swarm is now native to Docker, and this means it could be a really solid container orchestration service, even competing with the likes of Kubernetes, Rancher and so on.
Another great feature swarm feature enforces, is TLS mutual authentication and encryption to secure communications between itself and all other nodes. There is also cert rotation, which is awesome especially from a compliance point of view. The TLS encryption also ensures that the nodes are connecting to the correct managers in the swarm.
Docker / Swarm has seriously improved container networking, and the ability for containers to be load balanced and networked across multiple hosts within your swarm cluster, simplifies infrastructure that would have been a bit more complicated to setup in the past.
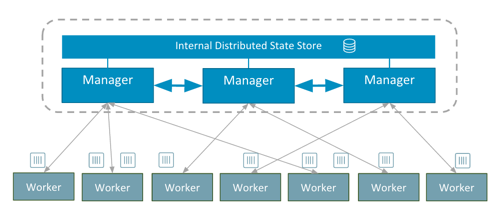
What exactly is a Swarm?
A swarm is composed of nodes joined together. A node is the base unit of computation for a swarm. a node in its simplest form is any machine running docker 1.12. (ie a Swarm Cluster)
cli
Lets see what swarm can do:
$ docker swarm

Usage:	docker swarm COMMAND

Manage Docker Swarm

Options:
      --help   Print usage

Commands:
  init        Initialize a swarm
  join        Join a swarm as a node and/or manager
  join-token  Manage join tokens
  update      Update the swarm
  leave       Leave a swarm

Run 'docker swarm COMMAND --help' for more information on a command.
We have the ability to create and intialise a swarm, join nodes as workers/managers to swarm, update the swarm, or tell a node to leave the swarm. Pretty simple…
And what is a node?
A node is the base unit of computation for a swarm. a node in its simplest form is any machine running docker 1.12.
There are two types of nodes in a cluster:
- Manager nodes: responsible for the scheduling/orchestration etc.
- Worker nodes: only responsible for taking work, executing it, and reporting back.
cli
$ docker node

Usage:	docker node COMMAND

Manage Docker Swarm nodes

Options:
      --help   Print usage

Commands:
  demote      Demote a node from manager in the swarm
  inspect     Display detailed information on one or more nodes
  ls          List nodes in the swarm
  promote     Promote a node to a manager in the swarm
  rm          Remove a node from the swarm
  ps          List tasks running on a node
  update      Update a node
the docker node has some useful things too. We can ls all nodes in the swarm, promote a worker node, to a manager node in the swarm, we can remove nodes from a swarm, we can inspect detailed info of one or more nodes in the swarm, we can also update a ndoe or view a list of running tasks on a node. Awesome!
In my next post, I will deep-dive into the network topology of a Swarm, but for now, lets see it in action!
I currently use docker-machine for test purposes. Docker-machine is a great tool that can use various drivers to spin up docker ready machines. I use the virtual box driver by default, and docker-machine allows me to spin up virtual machines that I can test. Head over to Docker to get started with Docker machine.
Lets create a swarm cluster
Using docker-machine lets create a some hosts to work with:
$ docker-machine create -d virtualbox manager1
$ docker-machine create -d virtualbox worker1
$ docker-machine create -d virtualbox worker2
$ docker-machine create -d virtualbox worker3
$ docker-machine ls
NAME       ACTIVE   DRIVER       STATE     URL                         SWARM   DOCKER    ERRORS
manager1   -        virtualbox   Running   tcp://192.168.99.100:2376           v1.12.0
worker1      -        virtualbox   Running   tcp://192.168.99.101:2376           v1.12.0
worker2      -        virtualbox   Running   tcp://192.168.99.102:2376           v1.12.0
worker3      -        virtualbox   Running   tcp://192.168.99.103:2376           v1.12.0
We now have 4 docker machines running the latest version of docker.
Now we need to initialise our swarm. We are going to do this on the manager node. In this case, I have named my host manager1 to be the manager.
Once we have all our machines running, lets initialise a swarm on the host we decided to be the manager node for the swarm (in this case manager1
$ eval $(docker-machine env manager1)

$ docker swarm init \
    --advertise-addr $(docker-machine ip manager1) \
    --listen-addr $(docker-machine ip manager1):2377
or ssh directly onto the host:
$ docker swarm init \
   --advertise-addr 192.168.99.100 \
   --listen-add 192.168.99.100:2377
In order to join nodes to our swarm, we need generate a swarm token.
To create the swarm token for manager nodes we run the join-token command on our initial manager:
$ docker swarm join-token manager
To add a manager to this swarm, run the following command:
    docker swarm join \
    --token SWMTKN-1-4x502sygb5ws0wwmpevndnp4d55bbxsmts339ylpuh37kiy5sv-79ugs5f3pwvv5jrom5b8dinhs \
    192.168.99.100:2377
To get the worker join-token we run the following command:
$ docker swarm join-token worker
To add a worker to this swarm, run the following command:
    docker swarm join \
    --token SWMTKN-1-4x502sygb5ws0wwmpevndnp4d55bbxsmts339ylpuh37kiy5sv-dl7jurksix80niuo2ncj9v0ak \
    192.168.99.100:2377
The join-token command prints out the command we need to run on manager and worker nodes. So from that output, we can now join nodes to the swarm. For this example, Im going to connect the the remaining three machines I created, as worker nodes, and run the join command with the worker join token:
# start with worker1
$ eval $(docker-machine env worker1)

$ docker swarm join \
    --token SWMTKN-1-4x502sygb5ws0wwmpevndnp4d55bbxsmts339ylpuh37kiy5sv-dl7jurksix80niuo2ncj9v0ak \
    192.168.99.100:2377

# and then worker2
$ eval $(docker-machine env worker2)

$ docker swarm join \
    --token SWMTKN-1-4x502sygb5ws0wwmpevndnp4d55bbxsmts339ylpuh37kiy5sv-dl7jurksix80niuo2ncj9v0ak \
    192.168.99.100:2377

# and finally, worker3
$ eval $(docker-machine env worker3)

$ docker swarm join \
    --token SWMTKN-1-4x502sygb5ws0wwmpevndnp4d55bbxsmts339ylpuh37kiy5sv-dl7jurksix80niuo2ncj9v0ak \
    192.168.99.100:2377
We now successfully have a Swarm cluster! Lets view some information about our swarm:
$ docker node ls
ID                                                      HOSTNAME  STATUS  AVAILABILITY  MANAGER STATUS
97zmo0c36dfj675dpg2q2rtg0    worker2         Ready      Active
c0q0ckwe3h39fbu9sv33069fo   worker3         Ready      Active
cjzcy20zu8uarq6g2l8z4eg9n *   manager1      Ready      Active                Leader
dmt4kjgeeem6bsqb2jcmvzuj1   worker1          Ready      Active
Now that we have a swarm running, lets dive into what makes Swarm mode awesome.
What is a service
A service defines tasks that are executed in the swarm.
cli
$ docker service

Usage:	docker service COMMAND

Manage Docker services

Options:
      --help   Print usage

Commands:
  create      Create a new service
  inspect     Display detailed information on one or more services
  ps          List the tasks of a service
  ls          List services
  rm          Remove a service
  scale       Scale one or multiple services
  update      Update a service
What is a task?
A task is the scheduling and execution of a service on a node.
$ docker service ls
ID            NAME     REPLICAS  IMAGE           COMMAND
1q10x534o7r7  vote     4/4       instavote/vote
Lets create a service:
For illustrative purposes, Im going to use an image use the instavote/vote image by the Richard Nelson. Its a great image to illustrate load balancing, scaling and orchestration of swarm mode.
We will use the docker service create command to create a service.
docker service create \
      --name vote \
      -p 8080:80 \
      instavote/vote
Once the image has been pulled and the serice has started, if we run docker service ls, we will see the replica count and service id of our services
$ docker service ls
ID            NAME     REPLICAS  IMAGE           COMMAND
1q10x534o7r7  vote     1/1       instavote/vote
But we want to know where the service is running, and what state it is…
$ docker service ps vote
ID  NAME    IMAGE  NODE DESIRED STATE CURRENT STATE  ERROR
4a4kv8mul0z87l5xx6aetkcnq   vote.1     instavote/vote  worker1      Running  Running 7 minutes ago
From that, we can tell that one container is running, as expected, it is running on the worker1 node in our swarm, its in a running state (sweet!), and its been running for since 7mins ago. Great!
But now, lets see how we can scale up our service. Lets run the docker scale command to increase the replicas to our desired state.
$ docker service scale vote=8
vote scaled to 8
Lets verify that this worked:
$ docker service ls
ID            NAME     REPLICAS  IMAGE           COMMAND
1q10x534o7r7  vote     8/8       instavote/vote
NOTE: you can scale multiple services with one command if you need to
$ docker service scale vote=8 redis=3That would scale our vote service to 8 and our redis service to 3. Neat! You can start to get the picture of how orchestration is now built into to Docker 1.12
Now that we have our services running, lets hit any of the IP addresses in our swarm, with the specified public port (:8080).
http://192.168.99.100:8080
or
$ http://192.168.99.101:8080
The swarm handles the requests across hosts within network. Meaning if I hit http://192.168.99.101:8080, but this host doesnt have our vote container running, it will serve the request from a host which does have the service and task running. It load balances across the network, and has service discovery thanks to the embedded DNS and routing mesh. So hosts can communicate with services running on other hosts!
Refresh your browser a few times (without changing your URL), and pay attention to the container that is displayed. You will notice that you will be served a new container ID each request. This is the load balancing in action! Change your URL to another host’s in your swarm, and refresh. You will notice the same events occurring. Although this is a very simple example, you can understand the benefit of how Swarm can simplify our lives! Scale the service down to even one host, and you will still be able to access the task!
What about rolling updates?
We have the ability to perform a rolling update across services, we can set up how many tasks to update simultaneously using the --update-parallelism parameter, and provide a delay between these updates using the --update-delay parameter in our command.
So lets update our vote service, to a new a image, by updating two tasks at a time, with a delay of 5 seconds.
docker service update --update-parallelism 2 --update-delay 5s --image instavote/vote:movies vote
So what is actually happening? :
$ docker service ps vote
ID                         NAME        IMAGE                  NODE      DESIRED STATE  CURRENT STATE            ERROR
bzbiaatsepuelp5xed2r3buoz  vote.1      instavote/vote:movies  worker1   Running        Running 5 seconds ago
76z1q06wkwmfa3vi3takbzyja   \_ vote.1  instavote/vote         worker2   Shutdown       Shutdown 10 seconds ago
esqzhtcnhbeggm6vqzgg2in1d  vote.2      instavote/vote         worker2   Running        Running 12 minutes ago
8kpimpn23rbblkd9ryo20f3pe  vote.3      instavote/vote:movies  manager1  Running        Running 16 seconds ago
2izr8nj1b6rpasb2ma1fm8au5   \_ vote.3  instavote/vote         worker1   Shutdown       Shutdown 22 seconds ago
3exkbmpp0p3c6ykgbks61ho81  vote.4      instavote/vote:movies  worker3   Running        Running 16 seconds ago
0llc7vko44azbomlft2xyp5wg   \_ vote.4  instavote/vote         worker3   Shutdown       Shutdown 22 seconds ago
7uuq8e5zwtq1y749n6qowz8e0  vote.5      instavote/vote         worker3   Running        Running 12 minutes ago
7w86nraco4vbiv87vuusb20z8  vote.6      instavote/vote         worker1   Running        Running 12 minutes ago
6e3cia1clf84ei0e3pfnqjaor  vote.7      instavote/vote:movies  worker1   Running        Running 5 seconds ago
5jdzyeiio5fw3bq5zbrvsnghu   \_ vote.7  instavote/vote         manager1  Shutdown       Shutdown 10 seconds ago
dv50nygbudyc4amdt0p3eg7rq  vote.8      instavote/vote         manager1  Running        Running 12 minutes ago
We can see the scheduling at hand here. It tells us the state of the running tasks, its scheduled services for updates, and will give us the state of each task at hand. After some time, all tasks will be running with the new image, and we would have had 0 down time in our rolling update.